How to Install MotoLights on BMW R1250GS: Step-by-Step Guide
How to Install MotoLights on BMW R1250GS: Step-by-Step Guide
How to Install MotoLights on BMW R1250GS: Step-by-Step Guide

This guide is designed to save you time and help you avoid the mistakes I made while installing MotoLights on my R1250GS. This is the easiest solution to install MotoLights on your motorcycle while keeping it looking professional.
BEFORE INSTALLATION
• Watch the MotoLights introduction video.
👉 Click here to buy MotoLights from Lone Rider.
👉 Click here to check my MotoLights Unboxing Reel.
👉 Click here to check my Before and After MotoLights Reel.
3 Possible Solutions for Placing MotoLights:
A) Under-nose mount
B) On Upper Crash Bars
C) On Engine Bars (in this case, you can keep OEM auxiliary lights)
This guide covers solutions A and B.
In my case, I upgraded to Upper Crash Bars.
Whatever you choose—whether it is solution A or B—you must remove the OEM auxiliary lights and OEM under-nose mount. The OEM under-nose mount can’t support the weight of MotoLights.
Therefore, you must use Lone Rider’s under-nose mount or place your MotoLights on Upper Crash Bars.
I do not recommend keeping the OEM auxiliary lights, as MotoLights are more than enough.
TOOLS NEEDED

• Torx T25
• 10 mm wrench
• Utility knife
• Flush cutters
Tools provided by Lone Rider:
• 13 mm wrench
• 5 mm Allen key
• Torx T30
You’ll also need a MacBook or laptop and access to the internet to update your software. I used a hotspot on my iPhone.
This guide is divided into six steps. Follow it chronologically. Don’t skip any steps to ensure a smooth and painless installation.
STEP 1 – Fairings Removal
NOTE: Use Torx T25 to remove screws in this part.
1.1. Remove the driver and passenger seats.
1.2. Remove side panels (1) by removing four screws and gently lifting the side panels toward you.
1.3. Remove the fairing (2) by removing the seven screws and gently pushing the fairing toward the front of the bike. Two screws are located on each side of the motorcycle, and the last three screws are located under the nose.
1.4. Remove the battery cover (3) by removing one screw and gently lifting the cover.
1.5. Remove the small black cover (4) on the left side of the motorcycle by removing one screw and gently lifting the cover.
1.6. Remove the black side cover (5) on the left side by removing two screws and pushing the cover to the rear side of the bike.

STEP 2 – OEM Auxiliary Lights Removal
NOTE: It is important to disconnect the wiring of the auxiliary lights before removing them with the under-nose mount.
IMPORTANT: Disconnect the negative terminal from the battery with a 10 mm wrench before continuing to step 2. You can also do it with a Phillips screwdriver, but in this case, you’ll need to pull the battery out.
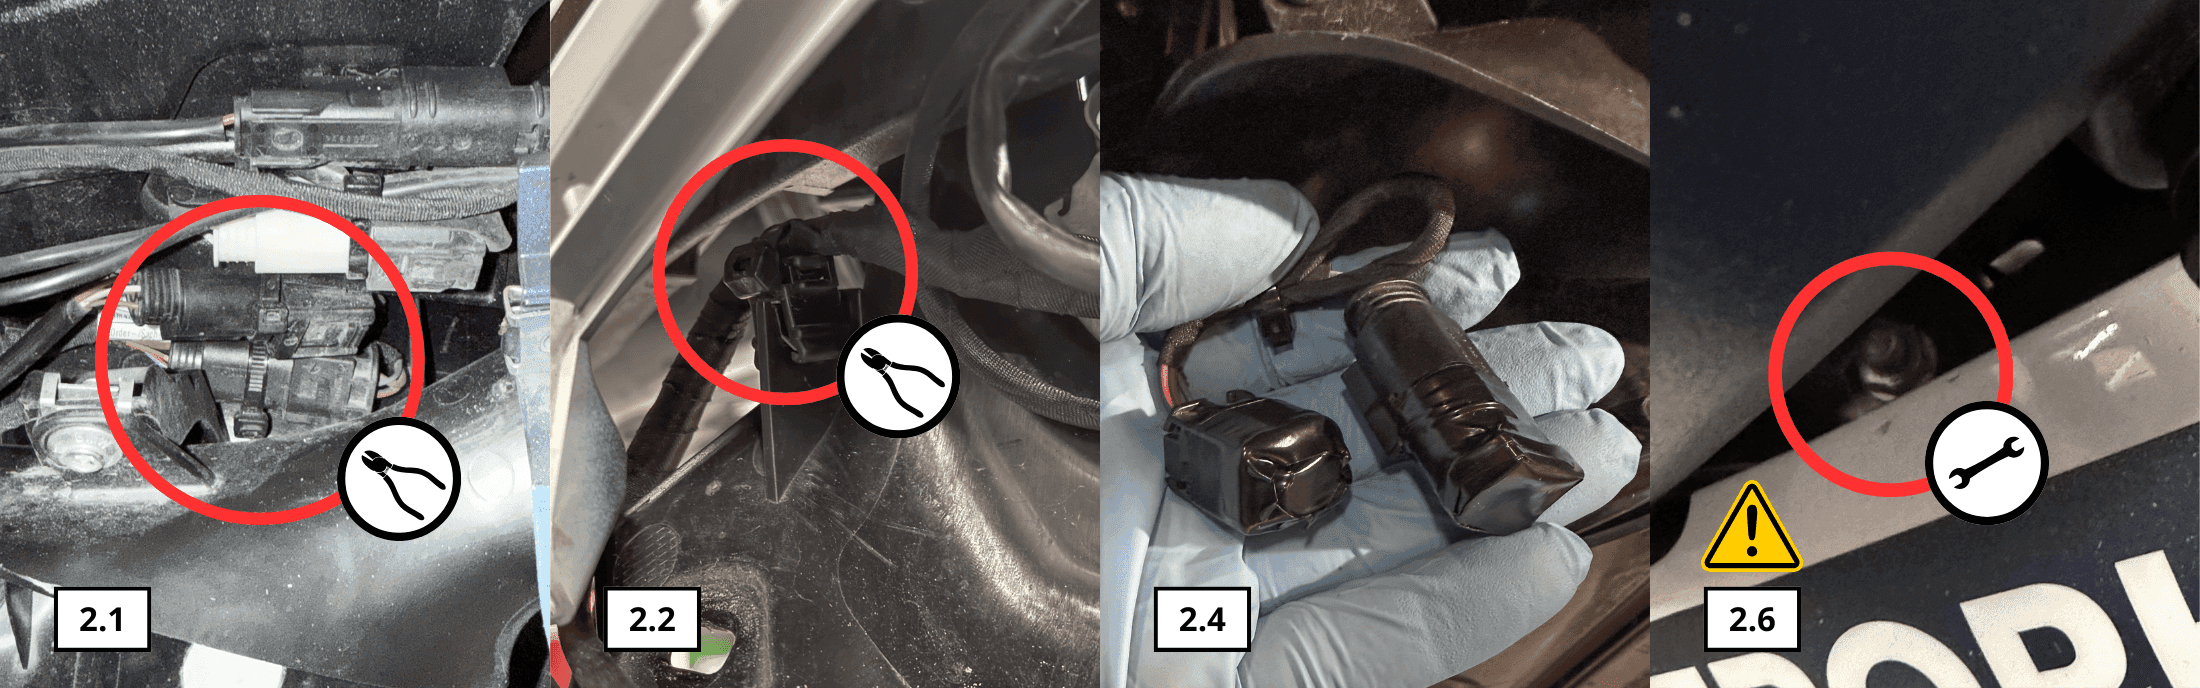
2.1. Use flush cutters to cut zip ties that hold two harness connectors to the motorcycle body.
2.2. Use flush cutters to cut zip ties holding wire harness to the motorcycle body.
2.3. Disconnect both harness connectors by pushing the release tab inside.
2.4. Use electrical tape to cover harness connectors fastened to the motorcycle. This will protect your harness connectors from moisture.
2.5. Use zip ties to secure harness connectors.
2.6. Use a 10 mm wrench to unscrew two bolts holding the under-nose mount.
NOTE: Hold the under-nose mount with one hand while removing two nuts, or it will fall on the ground after the nuts are removed.
2.7. Remove the under-nose mount with auxiliary lights.
STEP 3 – MotoCAN Installation
NOTE: Ensure the negative terminal on the battery is disconnected.
3.1. Locate the RDC connector under the passenger seat.
3.2. Use flush cutters to cut the zip tie holding the RDC connector.
3.3. Unplug the RDC connector or remove the protective cap.
3.4. Plug MotoCAN into the RDC connector.
3.5. Install MotoCAN wire harnesses (power supply) as shown in the pictures. Hide excess cables over the battery box.
3.6. Use Torx T25 to unscrew the positive terminal shown in the picture and connect the orange cable with the fuse.
3.7. Don’t connect the brown cable to the negative terminal on the battery yet. We will do this in step 5.
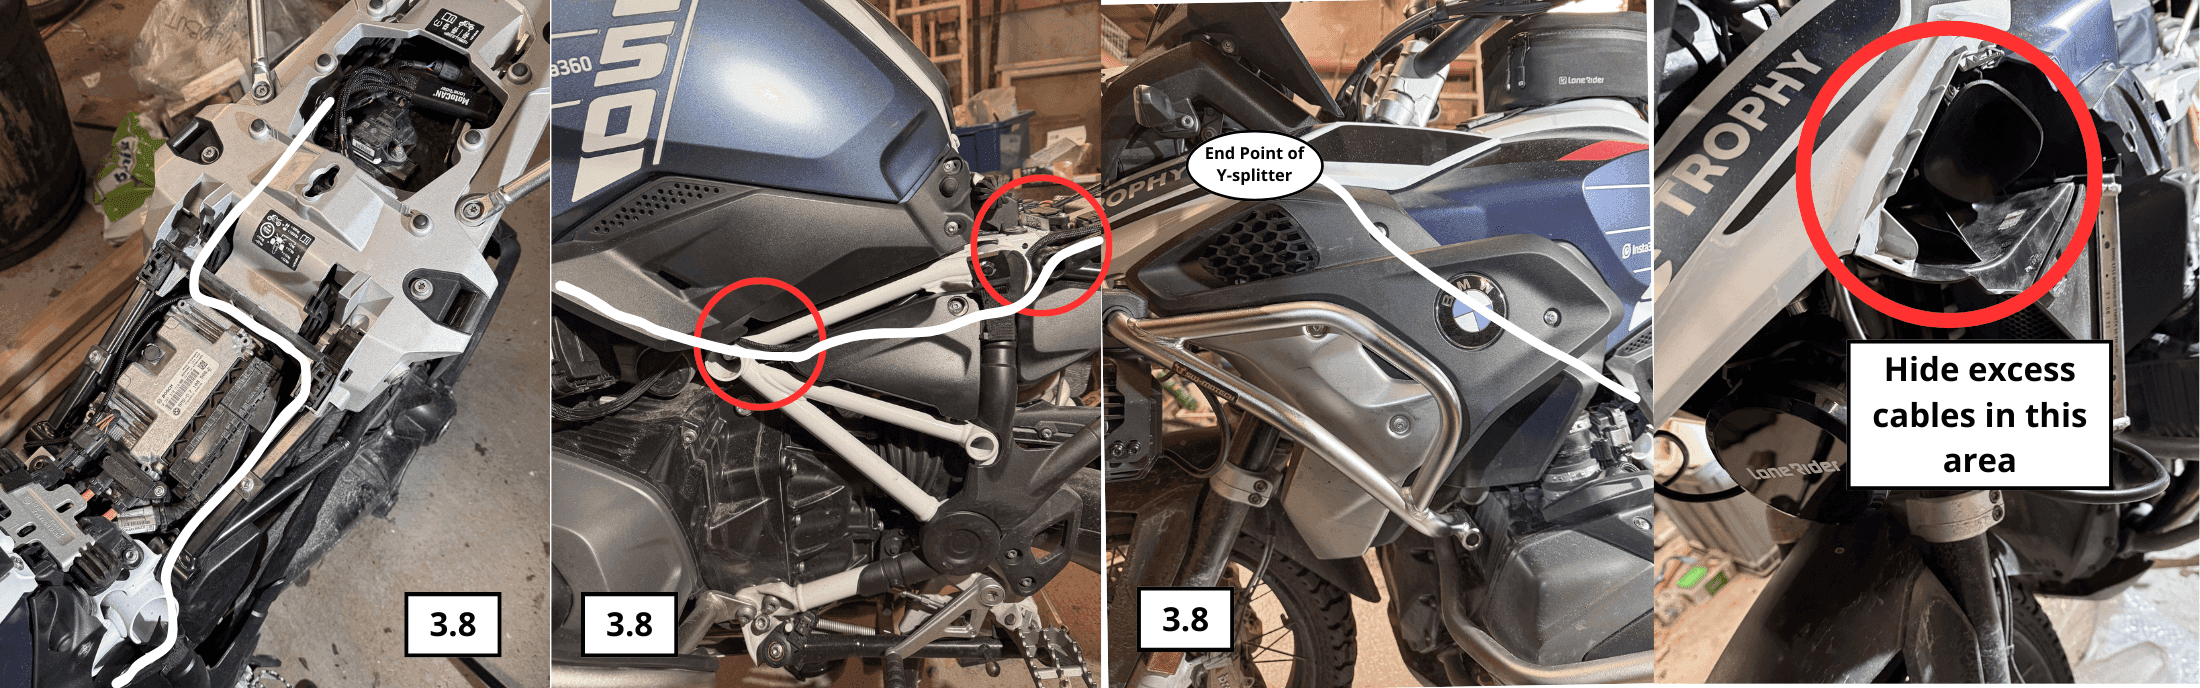
3.8. Connect the Y-splitter cable to the white cable/channel on MotoCAN and install the cable as shown in the pictures. Make it tight. If done correctly, the connectors on the Y-splitter should reach the area where the harness connectors of the auxiliary lights were.
3.9. Secure the Y-splitter cable with zip ties.


STEP 4 – MotoLights Installation
• Install the Lone Riders under-nose mount in the same place as the OEM.
OR
• Install upper crash bars according to the manual provided by the manufacturer.
4.1. Remove the C-brackets from the light pods for easier installation.
4.2. Install C-brackets on either the under-nose mount or upper crash bars.
NOTE: If installing on upper crash bars, use the anti-vibration rubber provided by MotoLights according to your bar diameter. In my case, my upper crash bars are 22 mm.
4.3. Connect MotoLights to the Y-splitter connectors.
4.4. Secure MotoLights cables with zip ties to prevent loose cables from hanging. Hide excess cables under the fairings (but behind the air intake).
NOTE: You don’t need to use the extension cable if the Y-splitter cable was installed correctly.

STEP 5 – Fairings Assembly
5.1. Check that all cables are secured with zip ties.
5.2. Check that all connectors are properly connected.
5.3. Check that MotoCAN is correctly connected to the positive terminal.
5.4. Check that the harness connectors from the OEM auxiliary lights are protected with electrical tape.
5.5. Ensure that cables and connectors are not in the way when assembling fairings. If they are, adjust them. Don’t use force when assembling fairings, as you can damage cables or fairings.
5.6. Connect the brown cable from MotoCAN to the battery’s negative terminal and tighten the bolt. Make sure the connection is secure.
5.7. Assemble fairings in reverse order of removal.
STEP 6 – MotoCAN Software and Final Pods Adjustments
6.1. Click here to download the required software.
6.2. Install the software.
6.3. Watch the provided video from the 17:35 mark for smooth software adjustments.
6.4. Watch the same video from the 29-minute mark for final pod adjustments.
You are DONE!
This guide is designed to save you time and help you avoid the mistakes I made while installing MotoLights on my R1250GS. This is the easiest solution to install MotoLights on your motorcycle while keeping it looking professional.
BEFORE INSTALLATION
• Watch the MotoLights introduction video.
👉 Click here to buy MotoLights from Lone Rider.
👉 Click here to check my MotoLights Unboxing Reel.
👉 Click here to check my Before and After MotoLights Reel.
3 Possible Solutions for Placing MotoLights:
A) Under-nose mount
B) On Upper Crash Bars
C) On Engine Bars (in this case, you can keep OEM auxiliary lights)
This guide covers solutions A and B.
In my case, I upgraded to Upper Crash Bars.
Whatever you choose—whether it is solution A or B—you must remove the OEM auxiliary lights and OEM under-nose mount. The OEM under-nose mount can’t support the weight of MotoLights.
Therefore, you must use Lone Rider’s under-nose mount or place your MotoLights on Upper Crash Bars.
I do not recommend keeping the OEM auxiliary lights, as MotoLights are more than enough.
TOOLS NEEDED
• Torx T25
• 10 mm wrench
• Utility knife
• Flush cutters
Tools provided by Lone Rider:
• 13 mm wrench
• 5 mm Allen key
• Torx T30
You’ll also need a MacBook or laptop and access to the internet to update your software. I used a hotspot on my iPhone.
This guide is divided into six steps. Follow it chronologically. Don’t skip any steps to ensure a smooth and painless installation.
STEP 1 – Fairings Removal
NOTE: Use Torx T25 to remove screws in this part.
1.1. Remove the driver and passenger seats.
1.2. Remove side panels (1) by removing four screws and gently lifting the side panels toward you.
1.3. Remove the fairing (2) by removing the seven screws and gently pushing the fairing toward the front of the bike. Two screws are located on each side of the motorcycle, and the last three screws are located under the nose.
1.4. Remove the battery cover (3) by removing one screw and gently lifting the cover.
1.5. Remove the small black cover (4) on the left side of the motorcycle by removing one screw and gently lifting the cover.
1.6. Remove the black side cover (5) on the left side by removing two screws and pushing the cover to the rear side of the bike.
STEP 2 – OEM Auxiliary Lights Removal
NOTE: It is important to disconnect the wiring of the auxiliary lights before removing them with the under-nose mount.
IMPORTANT: Disconnect the negative terminal from the battery with a 10 mm wrench before continuing to step 2. You can also do it with a Phillips screwdriver, but in this case, you’ll need to pull the battery out.
2.1. Use flush cutters to cut zip ties that hold two harness connectors to the motorcycle body.
2.2. Use flush cutters to cut zip ties holding wire harness to the motorcycle body.
2.3. Disconnect both harness connectors by pushing the release tab inside.
2.4. Use electrical tape to cover harness connectors fastened to the motorcycle. This will protect your harness connectors from moisture.
2.5. Use zip ties to secure harness connectors.
2.6. Use a 10 mm wrench to unscrew two bolts holding the under-nose mount.
NOTE: Hold the under-nose mount with one hand while removing two nuts, or it will fall on the ground after the nuts are removed.
2.7. Remove the under-nose mount with auxiliary lights.
STEP 3 – MotoCAN Installation
NOTE: Ensure the negative terminal on the battery is disconnected.
3.1. Locate the RDC connector under the passenger seat.
3.2. Use flush cutters to cut the zip tie holding the RDC connector.
3.3. Unplug the RDC connector or remove the protective cap.
3.4. Plug MotoCAN into the RDC connector.
3.5. Install MotoCAN wire harnesses (power supply) as shown in the pictures. Hide excess cables over the battery box.
3.6. Use Torx T25 to unscrew the positive terminal shown in the picture and connect the orange cable with the fuse.
3.7. Don’t connect the brown cable to the negative terminal on the battery yet. We will do this in step 5.
3.8. Connect the Y-splitter cable to the white cable/channel on MotoCAN and install the cable as shown in the pictures. Make it tight. If done correctly, the connectors on the Y-splitter should reach the area where the harness connectors of the auxiliary lights were.
3.9. Secure the Y-splitter cable with zip ties.
STEP 4 – MotoLights Installation
• Install the Lone Riders under-nose mount in the same place as the OEM.
OR
• Install upper crash bars according to the manual provided by the manufacturer.
4.1. Remove the C-brackets from the light pods for easier installation.
4.2. Install C-brackets on either the under-nose mount or upper crash bars.
NOTE: If installing on upper crash bars, use the anti-vibration rubber provided by MotoLights according to your bar diameter. In my case, my upper crash bars are 22 mm.
4.3. Connect MotoLights to the Y-splitter connectors.
4.4. Secure MotoLights cables with zip ties to prevent loose cables from hanging. Hide excess cables under the fairings (but behind the air intake).
NOTE: You don’t need to use the extension cable if the Y-splitter cable was installed correctly.
STEP 5 – Fairings Assembly
5.1. Check that all cables are secured with zip ties.
5.2. Check that all connectors are properly connected.
5.3. Check that MotoCAN is correctly connected to the positive terminal.
5.4. Check that the harness connectors from the OEM auxiliary lights are protected with electrical tape.
5.5. Ensure that cables and connectors are not in the way when assembling fairings. If they are, adjust them. Don’t use force when assembling fairings, as you can damage cables or fairings.
5.6. Connect the brown cable from MotoCAN to the battery’s negative terminal and tighten the bolt. Make sure the connection is secure.
5.7. Assemble fairings in reverse order of removal.
STEP 6 – MotoCAN Software and Final Pods Adjustments
6.1. Click here to download the required software.
6.2. Install the software.
6.3. Watch the provided video from the 17:35 mark for smooth software adjustments.
6.4. Watch the same video from the 29-minute mark for final pod adjustments.
You are DONE!

Semrah Sarajlija
Jan 13, 2025